
visit
Table of Content
Versions and Availability
h4
h5
Module Names for visit on qb2
| Machine | Version | Module Name |
|---|---|---|
| None Available | N/A | N/A |
▶ Module FAQ?
The information here is applicable to LSU HPC and LONI systems.
h4
Shells
A user may choose between using /bin/bash and /bin/tcsh. Details about each shell follows.
/bin/bash
System resource file: /etc/profile
When one access the shell, the following user files are read in if they exist (in order):
- ~/.bash_profile (anything sent to STDOUT or STDERR will cause things like rsync to break)
- ~/.bashrc (interactive login only)
- ~/.profile
When a user logs out of an interactive session, the file ~/.bash_logout is executed if it exists.
The default value of the environmental variable, PATH, is set automatically using Modules. See below for more information.
/bin/tcsh
The file ~/.cshrc is used to customize the user's environment if his login shell is /bin/tcsh.
Modules
Modules is a utility which helps users manage the complex business of setting up their shell environment in the face of potentially conflicting application versions and libraries.
Default Setup
When a user logs in, the system looks for a file named .modules in their home directory. This file contains module commands to set up the initial shell environment.
Viewing Available Modules
The command
$ module avail
displays a list of all the modules available. The list will look something like:
--- some stuff deleted ---
velvet/1.2.10/INTEL-14.0.2
vmatch/2.2.2

---------------- /usr/local/packages/Modules/modulefiles/admin -----------------
EasyBuild/1.11.1       GCC/4.9.0              INTEL-140-MPICH/3.1.1
EasyBuild/1.13.0       INTEL/14.0.2           INTEL-140-MVAPICH2/2.0
--- some stuff deleted ---
The module names take the form appname/version/compiler, providing the application name, the version, and information about how it was compiled (if needed).
Managing Modules
Besides avail, there are other basic module commands to use for manipulating the environment. These include:
add/load mod1 mod2 ... modn . . . Add modules
rm/unload mod1 mod2 ... modn  . . Remove modules
switch/swap mod . . . . . . . . . Switch or swap one module for another
display/show  . . . . . . . . . . List modules loaded in the environment
avail . . . . . . . . . . . . . . List available module names
whatis mod1 mod2 ... modn . . . . Describe listed modules
The -h option to module will list all available commands.
▶ Did not find the version you want to use??
If a software package you would like to use for your research is not available on a cluster, you can request it to be installed. The software requests are evaluated by the HPC staff on a case-by-case basis. Before you send in a software request, please go through the information below.
h3
Types of request
Depending on how many users need to use the software, software requests are divided into three types, each of which corresponds to the location where the software is installed:
- The user's home directory
- Software packages installed here will be accessible only to the user.
- It is suitable for software packages that will be used by a single user.
- Python, Perl and R modules should be installed here.
- /project
- Software packages installed in /project can be accessed by a group of users.
- It is suitable for software packages that
- Need to be shared by users from the same research group, or
- are bigger than the quota on the home file syste.
- This type of request must be sent by the PI of the research group, who may be asked to apply for a storage allocation.
- /usr/local/packages
- Software packages installed under /usr/local/packages can be accessed by all users.
- It is suitable for software packages that will be used by users from multiple research groups.
- This type of request must be sent by the PI of a research group.
h3
How to request
Please send an email to sys-help@loni.org with the following information:
- Your user name
- The name of cluster where you want to use the requested software
- The name, version and download link of the software
- Specific installation instructions if any (e.g. compiler flags, variants and flavor, etc.)
- Why the software is needed
- Where the software should be installed (locally, /project, or /usr/local/packages) and justification explaining how many users are expected.
Please note that, once the software is installed, testing and validation are users' responsibility.
About the Software
VisIt is an Open Source, interactive, scalable, visualization, animation and analysis tool.
users can interactively visualize and analyze data ranging in scale from small (less than 101 core) desktop-sized
projects to large (more than 105 core) leadership-class computing facility simulation campaigns. Users can quickly
generate visualizations, animate them through time, manipulate them with a variety of operators and
mathematical expressions, and save the resulting images and animations for presentations. VisIt contains
a rich set of visualization features to enable users to view a wide variety of data including scalar and
vector fields defined on two- and three-dimensional (2D and 3D) structured, adaptive and unstructured meshes.
Owing to its customizeable plugin design, VisIt is capabable of visualizing data from over 120 different
scientific data formats (see this partial list). [See a table of key features and a complete table of the tool's features.]
Usage
You will need to add one of the following set of keys to your software environment, depending on whether or not you want the serial or parallel version:
Keys For Serial Use:
+gcc-4.3.2
+visit-1.12.1-gcc-4.3.2
Keys For Parallel Use:
+gcc-4.3.2
+mvapich-1.1-gcc-4.3.2
+visit-1.12.1-gcc-4.3.2-mvapich-1.1
Since upgrades will happen, verify the keys available using the command: softenv -k.
▶ Softenv FAQ?
Since Fall 2018, SoftEnv has no longer been supported by HPC@LSU, and it is very unlikely that it will be brought back in the future. Therefore, all HPC users should use Modules to add/remove software packages in their work environment from now on. For advice or additional information, contactsys-help@loni.org
h4
Shells
A user may choose between using /bin/bash and /bin/tcsh. Details about each shell follows.
/bin/bash
System resource file: /etc/profile
When one access the shell, the following user files are read in if they exist (in order):
- ~/.bash_profile (anything sent to STDOUT or STDERR will cause things like rsync to break)
- ~/.bashrc (interactive login only)
- ~/.profile
When a user logs out of an interactive session, the file ~/.bash_logout is executed if it exists.
The default value of the environmental variable, PATH, is set automatically using SoftEnv. See below for more information.
/bin/tcsh
The file ~/.cshrc is used to customize the user's environment if his login shell is /bin/tcsh.
SoftEnv
SoftEnv is a utility that is supposed to help users manage complex user environments with potentially conflicting application versions and libraries.
System Default Path
When a user logs in, the system /etc/profile or /etc/csh.cshrc (depending on login shell, and mirrored from csm:/cfmroot/etc/profile) calls /usr/local/packages/softenv-1.6.2/bin/use.softenv.sh to set up the default path via the SoftEnv database.
SoftEnv looks for a user's ~/.soft file and updates the variables and paths accordingly.
Viewing Available Packages
The command softenv will provide a list of available packages. The listing will look something like:
$ softenv
These are the macros available:
*   @default
These are the keywords explicitly available:
+amber-8                       Applications: 'Amber', version: 8 Amber is a
+apache-ant-1.6.5              Ant, Java based XML make system version: 1.6.
+charm-5.9                     Applications: 'Charm++', version: 5.9 Charm++
+default                       this is the default environment...nukes /etc/
+essl-4.2                      Libraries: 'ESSL', version: 4.2 ESSL is a sta
+gaussian-03                   Applications: 'Gaussian', version: 03 Gaussia
... some stuff deleted ...
Managing SoftEnv
The file ~/.soft in the user's home directory is where the different packages are managed. Add the +keyword into your .soft file. For instance, ff one wants to add the Amber Molecular Dynamics package into their environment, the end of the .soft file should look like this:
+amber-8
@default
To update the environment after modifying this file, one simply uses the resoft command:
% resoft
The command soft can be used to manipulate the environment from the command line. It takes the form:
$ soft add/delete +keyword
Using this method of adding or removing keywords requires the user to pay attention to possible order dependencies. That is, best results require the user to remove keywords in the reverse order in which they were added. It is handy to test out individual keys, but can lead to trouble if changing multiple keys. Changing the .soft file and issuing the resoft is the recommended way of dealing with multiple changes.
Serial Execution
To run a serial instance, simply type visit on the command line. You can use visit -h to see what command options are available.
Parallel Execution
Complex processing on large amounts of data can be done on multiple processors in parallel, but requires some preparation. The first thing you will have to do is set up a host profile on each cluster you plan to use.
Host Profile
To create or modify a host profile, run: visit -gui
From the Options menu, select Host profiles. . .
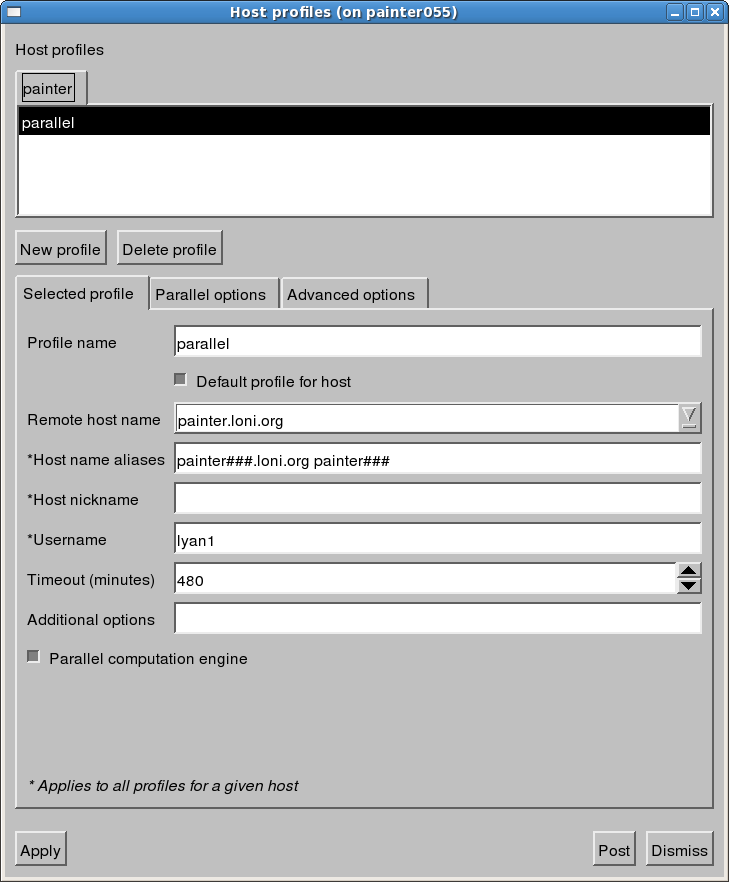
On the Selected profile tab, make sure "Host name aliases" are defined, based on the cluster's host name. For a host name of the form
hostname.domain.edu
Enter the following in the "Host name aliases" box:
hostname###.domain.edu hostname###
This is an example of what it should look like:
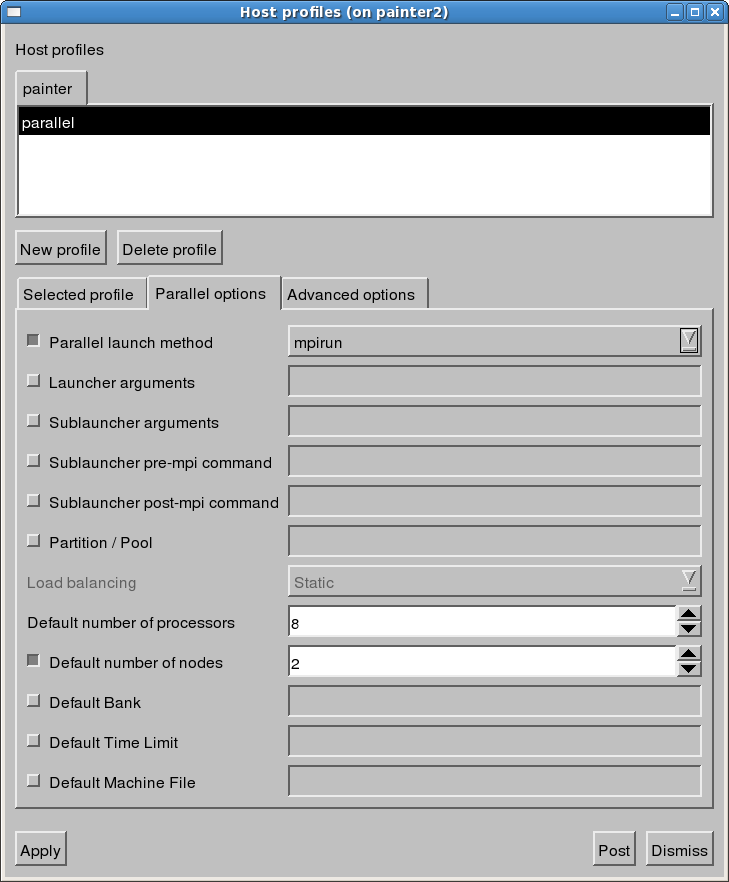
Then, on the Parallel options tab, set the MPI startup command, the number of nodes to use, and the number of cores. You'll have to be aware of how many cores per node are available on the cluster you're using. When done, it will look like this:
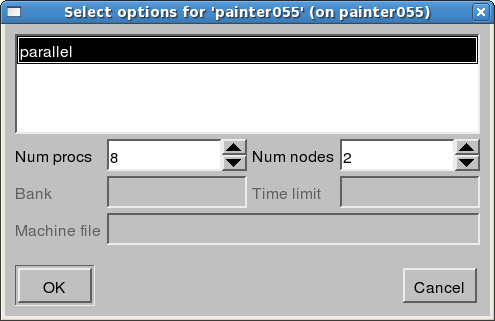
Profiles you define in this way are available for future use. You'll need a profile to match each set of nodes/cores you plan to use. When it comes time to process, the action of opening a file will pop up a dialog box to have you select the proper profile. Based on the example above, it will look like:
When the parallel version of Visit is executed, and the above profile is used, the following text should appear:
$ visit gui
Running: mpirun -np
8 /usr/local/packages/visit/1.12.1/gcc-4.3.2-mvapich-1.1/1.12.1/linux-x86_64/bin/engine_par
-host painter055 -noloopback -forcestatic -timeout 480 -port 5600
-plugindir :/home/lyan1/.visit/linux-x86_64/plugins:/usr/local/packages/visit/1.12.1/gcc-4.3.2-mvapich-1.1/1.12.1/linux-x86_64/plugins
Resources
- On-Line Documentation, including manual, FAQ, and more.
Last modified: September 10 2020 11:58:50.